bowl dust

  • Recipes
  • About
  • Search
squash_porridge.jpg

Squashed

November 11, 2017 by Tamara Hilmes

The sun rises at 7:30 a.m. and sets at 3:30 p.m. Hello, it's November in Sweden. As such, my body craves only warm bowls of oat mush. To add some variety to my breakfast routine, I've started experimenting. 'Tis the season of root vegetables and gourds, so gorge yourself on this orange-hued porridge? Maybe?

Butternut Squash Porridge
Yield: one large serving, or two smaller portions.

  • 1/2 cup gluten-free rolled oats
  • 1/4 cup butternut squash puree 
  • 1/2 cup coconut milk 
  • 1/3 cup water
  • Pinch of salt
  • 1 tsp vanilla
  • 1 tsp cinnamon
  • 1/4 tsp ginger
  • 1/8 tsp turmeric 
  • 2 tbsp raisins
  • 1 tbsp chopped pecans
  • 1 tsp maple syrup
  • 2 tsp coconut flakes
  • 1 tbsp jam (I used plum) 

Stir the oats, squash, coconut milk, water, and salt together in a 2-quart saucepan over medium heat. Add the vanilla, spices, and raisins, and bring to a simmer for 5-6 minutes or until it reaches your desired consistency, stirring often. Remove the porridge from heat and top with pecans, coconut flakes, a drizzle of maple syrup, and dollop of jam. 

To make butternut squash puree: preheat your oven to 400 degrees. Cut off the ends of the squash, then cut it in half, length-wise. Rub the cut side with olive oil, then place face-down on a baking sheet. Bake for 45 min. to 1 hour, or until tender. Allow squash to cool, then scoop out the flesh and mash with a fork. 

November 11, 2017 /Tamara Hilmes
Comment

Grӧt was I thinking?

February 12, 2017 by Tamara Hilmes

I’m addicted to grӧt. Translation: porridge. American translation: oatmeal with stuff in it.

I’ve lived in Stockholm for exactly one month now, and this is what life has come to. I am cold all the time, most foods lead to mysterious stomachaches, and I only want to eat out of bowls. So then, when I went to Pom & Flora (a super pretty and yes, hip, café) one morning and ordered a bowl of what I could only tell was vegan and had bananas and chia seeds in it, I was surprisingly thrilled when the server placed a big bowl of steamy oatmeal in front of me. I’ve never liked oatmeal. But porridge? Sign me up?

Porridge has a certain romance to it—it’s the stuff of the fairy tales, a food consumed by urchin children and forest animals all cozied up in tiny hovels. And, apparently, Swedes. Grӧt appears on the menu of nearly every hipster café in Stockholm (I know, because I’ve systematically visited all of them. Have I mentioned I have no friends here?). At Pom & Flora, it came topped with shaved pears, coconut flakes, cinnamon muesli, hazelnuts, and flax seeds. Greasy Spoon cooks theirs with rice milk, bananas, and cinnamon and tops it with mixed berries and candied pecans. Kaffeverket keeps it simple with cinnamon apple compote and a side of cold havredryck (oat milk).

Today, in honor of my surviving one month of limited sunlight, I’ve developed my own perfect porridge, taking bits and pieces from my café favorites. Speaking of favorites, here are some things I adore about my adopted home:

Fredagsmys
Cozy. Taco. Friday. The good people of Sweden legit have a single word that means all of those things. Each and every Friday, should you wander into a grocery store, you’ll find the area surrounding the Mexican food aisle completely packed. Likewise, if you try to hit up Taco Bar or La Neta on a Friday night, you’ll have to wait hours for a table. Why? Fridays are taco days. Why? I have no idea. But I love it.

Laktosfri
Those of you who know me know I’m cursed with lactose intolerance. I thought, mistakenly, that Swedish cuisine would be my hell: full of milk, butter, and cream. While traditional Swedish food is definitely soaked in dairy, most food establishments in Stockholm tend to offer one or more “laktosfri” options. The grocery stores are even better: there’s always an entire case dedicated to the dairy-free goods. Hallelujah.

Havredryck
Speaking of dairy-free things, havredryck, or oat milk, is one of my new favorite liquids to consume. It’s creamy and not-too-sweet and doesn’t separate in the gross way that soy and almond milks tend to. And oat milk yogurt? Ice cream? Sour cream? All amazing.

Reindeer
Yes, they are real, and yes they live in Sweden. You won’t find any in or around Stockholm, but if you travel up north, check your jerky: it might be made of Rudolph. Eep.

Stroller insanity
OK, so this isn’t exactly a favorite thing of mine, but I do find it totally crazy: parents will actually leave their babies outside in their strollers while they go into a cafe to eat. Yes, in the winter. Apparently, Stockholm is so safe that people don’t worry about leaving their coats and bags on the backs of their chairs while they get up to order or use the bathroom, and they don’t mind leaving their babies unattended OUTSIDE. I’ve heard the practice defended with words like, “They are bundled up in so many layers that their strollers are like little ovens.” But still, what??

The tunnelbana
Meet the subway system of Stockholm. It’s unlike any in the U.S. of A. It’s clean, quiet, and you pay by filling up a reusable plastic card that you tap on a reader to enter. No one eats or drinks or talks on the tracks or trains, and there’s no garbage, no used gum or cigarette butts, and no puke in sight. Ever. Imagine that.

There's more, of course, but I'll save some for next month... 


Maple Banana Porridge
Yield: one large serving, or two smaller portions.

  • 1 cup rolled oats
  • 2 cups oat milk
  • Pinch of salt
  • 1 tsp vanilla
  • 2 tsp brown sugar
  • 1 tbsp maple syrup
  • 1 ripe banana, sliced
  • 1 tbsp toasted hazelnuts, chopped in half  
  • 2 tsp coconut flakes
  • ¼ tsp chia seeds

Stir the oats, milk, and salt together in a 2-quart saucepan over medium heat and bring to a simmer for 5-6 minutes or until it reaches your desired consistency, stirring often. Remove the porridge from heat and stir in the vanilla, sugar, and maple syrup.

Transfer porridge to a bowl and top with banana slices and hazelnuts. Sprinkle on a tiny bit more brown sugar, then the coconut and chia seeds. Finish by drizzling a little more maple syrup over the top. If you like runnier porridge, pour cold oat milk on top.

February 12, 2017 /Tamara Hilmes
Comment
IMG_7302.JPG

Skillet me softly

January 07, 2017 by Tamara Hilmes

It's snowing in Brooklyn. While beautiful, it makes everything more difficult. If you dare to venture outside, that is. Instead, I found myself digging around for recipes that only require what I already have around the house. I was in luck: Smitten Kitchen's favorite chocolate brownie recipe fit the bill. But with no baking pans in sight (they're all in storage given my impending move to Stockholm), I turned to my trusty cast-iron skillet to bake a dairy-free rendition of these babies. I also added a microwaved bittersweet chocolate glaze at the last minute because why not?

IMG_7303.JPG

 Skillet Brownies w/ Sea Salt & Bittersweet Chocolate Glaze

ingredients: 

  • 1 stick unsalted butter (or Earth Balance)
  • 3 oz. unsweetened chocolate
  • 1 1/3 cups granulated sugar
  • 2 large eggs
  • 1 tsp of vanilla
  • 1/4 tsp salt (if using butter) 
  • 2/3 cups all-purpose flour

Preheat your oven to 350 degrees. Line a 10 or 12-inch cast-iron skillet with parchment paper and grease the bottom and sides. 

Fill a small saucepan with an inch of water and bring to a simmer. Place a heatproof bowl on top and melt together the butter and chocolate. Once melted, remove from heat and stir it until smooth. Whisk in the sugar, then the eggs one at a time. Add the vanilla and salt (if using). Use a spoon to stir in the flour and mix just until incorporated. Scrape batter into your prepared pan and bake for 25-30 minutes, or until a toothpick poked in the center comes out clean. Allow brownies to cool completely in the pan. To maintain clean tops, trace the lines where you're going to cut them when they are still hot. If you'd like, top with Maldonado sea salt and a bittersweet chocolate glaze. 

To make the glaze, microwave 1 oz. unsweetened chocolate with 2 tsp. non-dairy milk until melted. Stir in 1 tsp. light corn syrup and 1 tbsp. granulated sugar. Add milk as needed to get a drippy consistency. Use a soon to drizzle the glaze across the brownies.

January 07, 2017 /Tamara Hilmes
Comment
IMG_7243.JPG

Visionary indecision

January 02, 2017 by Tamara Hilmes

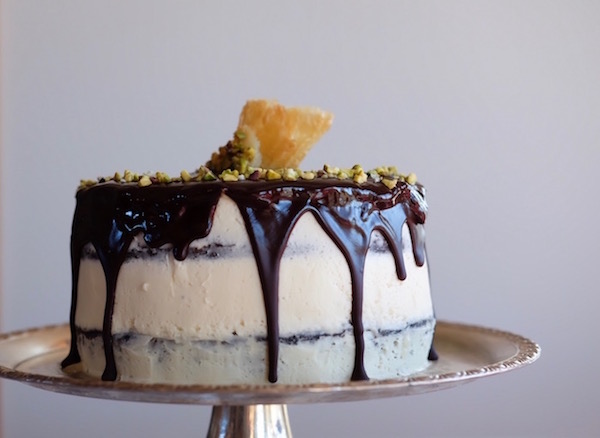
Today, my youngest sister turns 18. She is ten years my junior, and I've had the pleasure (?) of watching her grow up from a munchkin who forced us to watch The Jungle Book three times a day for a month into a lanky teen with a gorgeous singing voice. But she, like the rest of our family, is incredibly, even painfully, indecisive. For instance, she couldn't decide between a chocolate cake or baklava for her birthday dessert. And thus, this mutant cake was born. I give her (and you) the Chocolate Baklava Crunch Cake, concocted in my parents' kitchen a few days after Christmas out of sheer boredom. 

This cake wasn't an easy one, especially given that I only had two 8" pans and a toaster oven to work with—something I conveniently managed to forget as I (quite literally) drew up the plans for this thing. 

I decided to make a dairy-free variation of Ina Garten's chocolate cake for the cake layers, and I drew from a handful of baklava recipes to invent the flaky inserts for this dessert. To glue it all together, I whipped up a simple honey-vanilla buttercream, but replaced the butter with Earth Balance vegan buttery sticks. I did the same for the chocolate glaze that tops this puppy off. Unfortunately for the rest of my family, my inability to consume dairy led me to such experimentation. For those of you with no such affliction, however, I recommend sticking with unsalted butter and buttermilk for ultra-delicious results. 

IMG_7283.JPG

Although baking this cake took me half a day, each of these layers could easily be made in advance. And with an actual oven and four baking pans, it would go much, much faster. So if you like a little bite to your layer cake, and layered pastry inside your layered pastry, maybe give it a whirl? Here's a quick breakdown of what it takes: 

1) Make the chocolate cake layers. 

2) While the cakes are baking, prep the pans of baklava. 

3) Bake the baklava. 

4) While the baklava cools, prepare the sugar syrup. 

5) When you're ready to put it all together, whip up the frosting and start stacking. 

IMG_7242.JPG

Chocolate Baklava Crunch Cake

for the cake: 

  • 1 3/4 cups all-purpose flour
  • 2 cups granulated sugar
  • 3/4 cups cocoa powder
  • 2 tsp baking soda
  • 1 tsp baking powder
  • 1 tsp kosher salt
  • 1 cup buttermilk (or 1 tbsp lemon juice + 1 cup non-dairy milk) 
  • 1/2 cup vegetable oil
  • 2 large eggs at room temperature
  • 1 tsp vanilla extract
  • 1 cup hot coffee

Preheat your oven to 350 degrees and butter and flour two 8" cake pans. Sift together the flour, sugar, cocoa powder, baking soda, baking powder, and salt in the bowl of a stand mixer, then mix on low with the paddle attachment for a minute or so. In a separate bowl, whisk together the buttermilk, oil, eggs, and vanilla. With the mixer on the lowest setting, pour in the wet ingredients and mix until well combined. Stir in the hot coffee.

Pour the batter into your prepared pans and bake for 30-40 minutes, until a toothpick inserted into the center comes out clean. Cool the finished cakes in their pans for 10 minutes, then turn them out upside down onto wire racks and allow them to cool completely. 

 for the baklava:

  • 20 sheets frozen phyllo dough, thawed for at least 1 hour
  • 1 stick butter (or Earth Balance), melted
  • 1 cup coarsely ground raw pistachios
  • 1/2 tsp ground cinnamon
  • 1/4 cup panko crumbs
  • ¾ cup water
  • 1 ½ cups granulated sugar
  • 2 tbsp honey
  • 1 tsp lemon juice

Preheat (or keep your oven heated) to 350 degrees. Brush two 8” cake pans with melted butter. Remove one roll of phyllo dough from the box and unroll it. Lay it flat on a sheet of waxed paper, and cover it with cling wrap and a damp cloth to keep it from drying out as you work. Carefully pull off one sheet of phyllo dough and lay it in the bottom of one of the cake pans. Press down the corners that are hanging off, and brush it with melted butter. Repeat this four more times until you have five layers of pastry in the pan. Sprinkle it with ⅓ of the pistachio mixture to make an even layer, then add five more layers of pastry, brushing each with butter as you go. Repeat this process for the second cake pan, then bake both for 25 minutes, or until golden.

While the baklava cools, make the syrup. Bring the water, sugar, and honey to a boil over medium heat and cook, stirring occasionally, for 10-15 minutes. Add the lemon juice and cook for five more minutes. Remove the syrup from the heat and pour it over both pans of pastry. Allow the baklava to cool completely before constructing your cake.

for the frosting:

  • 1 ½ sticks butter, at room temperature
  • 2 cups powdered sugar  
  • 1 tsp vanilla extract
  • 1 tbsp milk

Cream together the butter and sugar until fluffy, then gradually add the powdered sugar. Beat in the milk and vanilla, and beat on high for 2-3 minutes, until the frosting is light and fluffy, and a shade lighter in color. Add more sugar, if needed.

for the chocolate glaze:

  • 3 tbsp butter
  • ¾ cup chocolate chips
  • 1 tbsp light corn syrup
  • ¼ tsp vanilla extract

Once your cake is constructed and chilled, make the glaze. Bring a small amount of water to a simmer in a small saucepan. Place a heatproof bowl on top, and add the butter. Once the butter is melted, stir in the chocolate chips and corn syrup. Continue stirring until the mixture is completed melted and smooth. Remove the pan from the heat and stir in the vanilla. Pour over the top of your cake and with a spatula, smooth it to the edges, allowing some to drip down the sides.

IMG_7226.JPG

to construct your cake:

1) Once the cake layers and baklava have cooled, place one cake layer top side up in the center of a cake stand.

2) Fill a pastry bag (no tip) with buttercream frosting and pipe a thick band about ¼ an inch inside the edge of the cake.

3) With an offset spatula, scoop more frosting into the center of the cake and smooth it to fill in the circle.

4) Remove one of the baklava layers from its pan and place it on top of the layer of frosting. Make sure the baklava is 100% cool when you do this, or you’ll melt the frosting (believe me, you don’t want to risk it).

5) Pipe another ring of frosting on top of the baklava and smooth on another layer. Place the second cake layer upside down on top of the frosting.

caketop.jpg

6) Pipe a third ring of frosting and use the spatula to smooth it across the top, letting the excess fall down on the sides. Add enough frosting to the sides to create a smooth, thin layer. Either cover it completely, or let some of the cake show through.

7) Chill your frosted cake for 2 hours or overnight before pouring on the glaze. Top with ground pistachios and pieces of the extra baklava layer (or keep it to snack on separately). 

January 02, 2017 /Tamara Hilmes
Comment
pumpkinbread.jpg

A quick fix

December 09, 2016 by Tamara Hilmes in Fall

This just in: I'm moving to Sweden. That's right, I'm retreating into an even colder, darker landscape, because my SAD just isn't bad enough at the moment. As a result, I need to clear out my pantry, STAT. The majority of my hoards consists of baking supplies: flours, sugars, spices...it's all got to go. It's difficult, however, to find recipes that won't require me to purchase additional stuff to add to my stash. It's even more difficult to find a recipe that's dairy-free. 

The solution? Quick breads. I previously posted Abraco's olive oil cake, which I baked up again on Tuesday, and yesterday I turned to my mom's ever-delectable pumpkin bread. The recipe is simple, so simple that I'm always convinced I've missed something in transcribing it from my mom's index card. I'm also often tempted to add more spices, but really, this autumnal cake-bread hybrid is perfect as it is (yes, even with that entire cup of oil). 

Pumpkin Bread
Recipe from my Kansas-bred mom, Kelly

  • 3 1/2 cups all-purpose flour
  • 3 cups granulated sugar
  • 3 tsp baking soda
  • 4 eggs
  • 1 cup vegetable or canola oil
  • 2/3 cup water
  • 2 cups (1 can) pumpkin
  • 1 cup chopped pecans or walnuts
  • 1 tsp cinnamon
  • 1 tsp nutmeg

Preheat your oven to 350 degrees, and grease and flour two 9x5 loaf pans and one 5.75x3 loaf pan. In a large mixing bowl, whisk together the flour, sugar, and baking soda. Make a well in the center of the flour mixture, add the eggs, oil, and water, and stir to combine. Next, add the pumpkin. Once it's fully incorporated, add the nuts and spices and mix again. 

Divide the batter among the prepared pans, filling each about 1/3 of the way full. Bake for 1 hour, but check the small loaf after 45 minutes. Once done, the loaves will be dark brown on top, and when you insert a toothpick it should come out crumb-free.  


December 09, 2016 /Tamara Hilmes
bread, breakfast
Fall

Curry some flavor

February 01, 2016 by Tamara Hilmes in Winter

It was a frigid night in January, and the bright lights of a two-story Burger King shone down on a nearly deserted Empire Boulevard. But not too far away, the fogged windows of a steamy little establishment beckoned to passers-by. The Food Sermon, the tiny, counter-only situation I made a pilgrimage to that evening, serves a small but well-received array of curries and roti and goat. It was their vegetable rice bowl that inspired this — I'll say it — much better adaptation that's totally doable at home. 

Coconut Ginger Veggie Bowl

  • Olive oil
  • 1 medium yellow onion, mince one half and slice the other
  • 2-inch chunk of ginger, minced 
  • 3 cloves of garlic, minced
  • 1 can of unsweetened coconut milk
  • A pinch of chili powder
  • A dash of cayenne 
  • Several drops of chili oil (optional) 
  • 1/2 tsp ground ginger 
  • 2 tsp curry powder 
  • 1 tsp agave nectar 
  • A dash of salt 
  • 1 small head of broccoli, broken into florets 
  • 2 sweet potatoes, diced 
  • 2 cups of fresh green beans, trimmed
  • 1 can of red kidney beans
  • 1 small bunch of kale, washed and torn
  • 4 cups cooked brown rice 
  • Salt 
  • Black pepper

For the sauce: 

Heat 1 tbsp of olive oil in a two-quart saucepan, then add the minced onion and cook just a few minutes until translucent. Add the minced ginger and half of the garlic. Cook for thirty seconds, then pour in can of coconut milk. Stir in chili powder, chili oil, cayenne, ground ginger, and curry power. Add agave and a dash of salt. Bring to a strong simmer for five minutes, then turn down to low until ready to serve.

For the bowl: 

Preheat oven to 400 degrees. Toss diced sweet potatoes and a few teaspoons of olive oil in a large bowl until coated. Spread potatoes in a single layer on a cookie sheet and season well with salt and pepper. Roast for 25-30 minutes (or until brown and crisp), flipping them over halfway through.

Meanwhile, heat 2 tbsp of olive oil in a large cast-iron skillet over medium. Add the sliced onion and cook for a few minutes until translucent. Add garlic and cook for 30 seconds more before adding the broccoli and green beans. Season with salt and pepper, and cook for 8 minutes. Add beans and kale and cook until all vegetables are tender and kale is wilted.

When ready to serve, divide rice between four bowls and add the potatoes and vegetables. Be sure to spoon a generous amount of the sauce over each bowl as the rice will soak up a lot of it. 

February 01, 2016 /Tamara Hilmes
bowl, vegetarian, dinner
Winter
Comment

Olive your cake, please

January 23, 2016 by Tamara Hilmes in Winter

Should a blizzard strike your city, stay inside. Sip coffee. Don't talk to strangers. But to ensure you don't miss out on that Saturday-morning-pastry routine, make a simple loaf of something none-too-sweet, like East Village espresso counter Abraço's beloved olive oil cake. 

Abraço's Olive Oil Cake

Recipe dug up + shared by Lingered Upon

  • 1 1/2 cups all-purpose, unbleached flour
  • 1 cup sugar
  • 1/2 tsp baking soda
  • 1/2 tsp baking powder
  • 1/4 tsp salt
  • 2 large eggs
  • 3/4 cup whole or soy milk 
  • 1/2 cup extra-virgin olive oil 
  • 2 tsp finely grated orange peel 

Preheat oven to 325 degrees. Coat a 9x3x5 loaf pan with oil and flour. In a medium-sized bowl, whisk the first five (dry) ingredients together. In a separate bowl, whisk together the eggs, milk, olive oil, and orange peel until blended. Gradually whisk the liquids into the dry mixture just until combined. Pour batter into the prepared pan and bake for 45-60 minutes, or until a toothpick inserted into the center comes out clean. Cool the cake in the pan for 20 minutes before serving, ideally alongside a cup of coffee. 

January 23, 2016 /Tamara Hilmes
cake, breakfast
Winter
Comment
IMG_5476.JPG

Downward spiral

November 09, 2015 by Tamara Hilmes in Fall

When the daylight dies at 5 p.m., most things seem awful. Not so with this dish inspired by Bar Chuko, a Japanese small plates spot in Prospect Heights. Its menu's vegetarian standout is 100% the coconut noodles. Spicy, tangy, and slightly sweet, they taste like a lighter version of Yotam Ottolenghi's curry laksa. Pair those flavors with a small, handheld spiralizer and like thus, this soup is born. 

Coconut Zucchini Noodles

  • 2 tbsp sunflower oil
  • 2 shallots, peeled and sliced
  • 4 cloves garlic, minced
  • 1 inch piece ginger, minced
  • 1 stalk lemongrass (soft white stem only)
  • 1 tsp dried coriander
  • 1 long, skinny green chile, sliced
  • 1 tbsp sambal oelek
  • 1 bunch cilantro
  • 2 cups vegetable broth
  • A pinch of dried curry leaves
  • 1 tsp curry powder
  • ½ tsp cumin
  • ¾ tsp salt
  • 1 tbsp sugar
  • 13.5 oz coconut milk
  • ½ cup water
  • 1 package yaki udon noodles (the refrigerated kind)
  • 2 limes, sliced into wedges
  • 1 zucchini, spiralized

Heat sunflower oil over medium, then add shallots, ginger, and garlic and cook over low for a few minutes. Add lemongrass, coriander, green chile, sambal, and a few stalks of cilantro and cook over low, stirring frequently for 15 minutes. Stir in broth, curry leaves, curry powder, cumin, salt, sugar, coconut milk, and water, then gently simmer for 30 minutes.

Meanwhile, spiralize the zucchini and divide into three or four bowls.

When the 30 min. are up, remove the lemongrass stalk. Then, add the soba noodles to the simmering broth. Cook for three more minutes, then divide noodles and broth among the bowls of zucchini.

Garnish with lime and cilantro before serving. (Serves 3-4)


November 09, 2015 /Tamara Hilmes
Soup
Fall
Comment
cornchowder.jpg

Aw shucks

November 02, 2015 by Tamara Hilmes

Corn chowder. You've seen it before. In fact, you've seen it before on Bowl Dust, but we'll call this the reprise. My recipe for Chipotle Corn Chowder was the first I put on this thing though, at the time, I had been so shortsighted as to not photograph what turned out to be a pretty delicious soup. This time, I toned down the spice levels slightly, swapped soy for a more neutral almond milk, and messed with the simmering times a tad. The result? A very simple and classic corn chowder that, suffice it to say, will never go out of style.

Classic Corn Chowder

  • 2 tbsp olive oil
  • 1 yellow onion, diced
  • 4 cloves garlic, minced
  • 4 medium red potatoes, chopped into 1-inch pieces
  • 2 cups frozen or fresh yellow corn kernels
  • 4 sprigs of fresh thyme, stems removed
  • ⅛ tsp chili powder 
  • 2 cups vegetable stock
  • 1 cup water
  • 1 cup milk or almond milk
  • 1 tsp salt
  • ¼ tsp pepper

Heat olive oil in a 2-quart saucepan over medium heat. Add onions, season with salt, pepper, and chili powder and cook until translucent. Add garlic, and cook for 30 seconds more. Add vegetable stock and water, stir, and bring to a simmer. Cook for 10 minutes until slightly reduced.

Add milk, potatoes, corn, and thyme and bring back to a simmer. Cook 15-20 minutes more, uncovered, until potatoes are tender.

Once potatoes are sufficiently soft, remove a cup of them, smash with a fork until smooth, then add back to the saucepan. Repeat with a second cup of potatoes.

Add more salt and pepper to taste. Serve with bread, or garlic croutons (recipe to follow).

Garlic Croutons

  • 1 crusty italian loaf
  • 3 tbsp olive oil
  • 1 clove garlic, crushed and minced
  • ¼ tsp dried or fresh herbs
  • ¼ tsp onion powder
  • ¼ tsp salt

Move rack to the top third of the oven and preheat to 400 degrees. Cut bread into 1.5-inch chunks and toss in bowl with olive oil. Add salt and spices and mix.

Spread bread in a single layer on a baking sheet. Bake for about 15-20 minutes, stirring halfway, until golden brown.

November 02, 2015 /Tamara Hilmes
Comment

Orzo you thought

September 13, 2015 by Tamara Hilmes in Summer

Bowl Dust was gone forever. Orzo you thought. But with a spontaneous spurt of culinary energy, here it is again. Held back as I was by a surprising bout of happiness (!) combined with summer (stovetop + AC do not mix), and a move to a rather minuscule studio "kitchen," all things requiring slicing and stirring came to a halt. But never fear: fall—as in fall face-first onto your bed each night in anticipation of the brutal, gloomy months ahead—fast approacheth. Cooking, then, will soon be back in season.

For now, and for all those living in fewer than 300 square feet, or who are simply lacking in counter space and/or the wherewithal to wash heaps of dishes, here's a simple warm orzo salad that's so confoundedly velvety and rich you won't mind eating it day after day, for the rest of the week, until you've used up every ounce of the produce you purchased on Sunday (as they say, waste not, wallow less). Living in grimy, tiny Brooklyn apartments certainly isn't glamorous, but here—at least you can eat something delicious. 

Easy Tomato Basil Orzo

  • 1 tbsp olive oil 
  • 1 cup uncooked orzo 
  • ½ tsp onion powder 
  • 1 ¼ cup chicken or vegetable broth 
  • 2 medium heirloom tomatoes, cut into small wedges
  • 12 fresh basil leaves, chopped 
  • 1 tbsp balsamic vinegar
  • 1 tsp freshly ground black pepper

Heat oil over medium in a 2-quart saucepan. Add orzo and onion powder, stir, and cook for one minute. Add broth and bring to a boil. Lower the heat and simmer for 10-12 minutes, or just until all of the liquid is absorbed. Remove from heat.

Toss tomatoes and basil into the orzo. Stir in the balsamic vinegar and pepper and serve while still warm. This is also great one day later after said orzo has been exposed to several hours of refrigeration. 


September 13, 2015 /Tamara Hilmes
savory, orzo, salad
Summer
Comment
khaosoi.jpg

Khao Sort-Of

January 25, 2015 by Tamara Hilmes in Winter

Full disclosure: I have never truly eaten khao soi. That is, I have not have the pleasure of slurping down an authentic bowl of the Northern Thai curry noodle dish. This rendition is adapted from a Bon Appetit recipe, and altered based on menu descriptions, ingredient lists, and Instagram images I found while searching for more information about this sassy soup. I have zero clue whether this tastes like the *real deal*, but I can tell you that it's delicious and simple to make. 

Curry. Ginger. Chili pepper. Cilantro and lime. If you're a fan of this flavor combo, it's worth a shot. 

Vegetarian Khao Soi (kinda)

For the paste:

  • 4 large dried guajillo chiles, stemmed, halved, and seeded
  • 2 medium shallots, peeled and halved
  • 8 cloves garlic
  • 1, 2-inch piece ginger, peeled and sliced
  • 1/4 cup cilantro stems, chopped
  • 1 tbsp ground coriander
  • 1 tbsp ground turmeric
  • 1 tsp curry powder 

For the soup: 

  • 2 tbsp vegetable oil
  • 1, 14 oz. can unsweetened coconut milk
  • 3 cups low-sodium vegetable stock
  • 1 lb. Chinese egg noodles
  • 3 tbsp veggie fish sauce
  • 1 tbsp (packed) brown sugar
  • salt
  • Serve with: sliced red onion, bean sprouts, cilantro sprigs, chili oil, crispy noodles, and lime wedges

Boil water in a small saucepan. Remove from heat and add dried chiles. Let soak until softened, 25–30 minutes. When soft, drain chiles, but save the soaking liquid. Purée chiles, shallots, garlic, ginger, cilantro stems, coriander, turmeric, curry powder, and 2 tbsp. soaking liquid in a food processor or blender, adding more soaking liquid a tablespoon at a time, if needed, until smooth.

Heat oil in a large heavy pot over medium heat. Add paste and cook, stirring constantly, until slightly darkened, ~10 minutes. Add coconut milk and stock and bring to a boil. Reduce heat and simmer about 20–25 minutes. Meanwhile, cook noodles according to package directions. Once soup has simmered, add 3 tbsp. of fish sauce and brown sugar to soup. Season with salt or more fish sauce, if needed. Divide soup and noodles among bowls and serve with toppings.


January 25, 2015 /Tamara Hilmes
Soup
Winter
Comment
photo (32).JPG

Fried cider

October 22, 2014 by Tamara Hilmes in Fall

Sigh. Fall has sunk its annual hope-turned-despair into the weary bones of my being. And with the arrival of such dismal grey days and biting winds, what's a girl to do but turn on her stove, oven, or any heating apparatus in sight, really, and just stand near it? But I can't just stand there — my roommate would think I'm insane. And so, things like donuts tend to happen. 

Cider donuts are of the few joys that this dumb, leaf bedraggled season brings with it. But some are unable to enjoy even these — like my Celiac's-ridden pal, for instance. But when her pumpkin-carving party was afoot, I felt it was necessary to attempt a cider donut, sans gluten, for the hostess. 

All that said, if you like your food full of wheats, feel free to substitute normal-people flour. 

Gluten-free Cider Donuts

Adapted from Pumpkin Patches & More 

For the donuts:

  • 1 cup apple cider
  • 1 cup granulated sugar
  • 3 1/2 cups Bob's Red Mill Gluten-free all-purpose flour, plus additional for the work surface
  • 1 tsp guar gum 
  • 2 teaspoons baking powder
  • 1 teaspoon baking soda
  • 1/2 teaspoon ground cinnamon
  • 1/2 teaspoon salt
  • 1/8 teaspoon ground nutmeg
  • 4 tablespoons butter (at room temperature)
  • 2 eggs
  • 1/2 cup buttermilk (low-fat or nonfat works fine
  • vegetable oil, for frying 

For the sugar coating:

  • 1 cup granulated sugar
  • 1/2 teaspoon cinnamon

Boil apple cider in a small saucepan until it is reduced to 1/4 cup of syrup (about 25 min), then set aside. Meanwhile, beat butter and sugar in a mixer until fluffy and beat in eggs, one at a time. With the mixer on low, add in the buttermilk and reduced cider. In a separate bowl, mix together the dry ingredients. Slowly add the dry to the wet and mix until just combined. If the dough looks too wet to come together, add a bit more gluten-free flour. 

Line a baking sheet with parchment and sprinkle generously with GF flour. Turn dough onto the baking sheet and pat it out until it's about 1/2 inch thick. Place baking sheet in freezer for 20 minutes. Once chilled, use a floured doughnut cutter or a 3-in.-wide glass to cut circles out of the dough. Combine scraps, and cut again. Cut smaller holes in the center using a tall shot glass or other small glass. Return baking sheet to freezer for another 20 min. 

Heat 1.5 inches of vegetable oil in a large cast-iron skillet or fryer using a thermometer to bring it to 350 degrees. It's crucial that throughout the donut frying process you keep the temperature as close to 350 as possible (you will need to adjust constantly). Cover a plate or baking sheet with two layers of paper towels and set it nearby the stove. Mix together the cinnamon and sugar in another bowl for dipping hot donuts in as they're ready. 

When the oil is hot, remove one donut shape from the freezer and place gently in the oil so it doesn't splatter. After about 1 min., turn the donut using a metal spatula and fork. The donut should be a dark golden color. Cook the second side for 1 min., then use the spatula to remove it and place it on the paper towels. Let the hot donut rest/cool/drain a couple minutes before rolling in the cinnamon-sugar mixture and setting on a plate to cool completely. Repeat with remaining donuts and holes, and be careful to adjust that temperature on the reg! 

Allow the oil to cool completely before pouring it into a jar and disposing of it. 


October 22, 2014 /Tamara Hilmes
Sweet
Fall
Comment
blackberry tart

Orange is the new blackberry

June 07, 2014 by Tamara Hilmes in Summer

I'd like to say that the sun is the sole reason for my hiatus. That's mostly true, although laziness, exhaustion, and vacation have also been factors in my inability to bake things.

But I'm back for another season — literally. Summer has essentially settled in and despite higher levels of vitamin D, my outlook isn't really any less grim. Though, I'm also avoiding the purchase of an air conditioner at all costs, so turning on the oven isn't really an option...

We'll see how this plays out. 

Blackberry + Orange Tart 

For the shell: 

  • 1 stick butter, softened 
  • 1/3 cup brown sugar 
  • 1/4 tsp vanilla 
  • 1 pinch salt 
  • 1/4 tsp cinnamon
  • 1/4 cup all-purpose flour
  • 1/4 cup rye flour
  • 1/4 cup whole wheat flour
  • 1/2 cup rolled oats 
  • 1/4 cup chopped pecans

For the filling: 

  • 3 cups fresh blackberries, rinsed
  • 2 tbsp cornstarch
  • grated zest of 1 small orange
  • 2 tbsp fresh orange juice 
  • 2 tbsp brown sugar 

In a large mixing bowl, cream butter, sugar, salt, cinnamon, and vanilla. Stir in the flours (note: you can also use all-purpose flour in place of the others to simplify the recipe, I just happened to have these on hand), along with the oats and nuts until well combined. Press mixture into a 9-inch tart pan and place in the freezer for 20 minutes. 

Preheat oven to 400 degrees. In your mixing bowl, combine the mixed berries, cornstarch, sugar, zest, and juice and mix well, bruising the berries slightly in the process. Set mixture aside. 

Remove tart shell from the freezer and press a piece of tinfoil firmly into the bottom of the shell. Bake for 7 minutes, remove the tinfoil, and return to the oven for another 8 minutes. Allow the shell to cool, pressing the bottom (which will have bubbled up) back into the pan. 

Once the shell has cooled slightly, place it on top of a baking sheet. Pour the berry mixture into the shell, spread the berries evenly, and bake in the oven for 20-25 minutes. Allow it to cool completely, then serve with vanilla ice cream (optional: garnish with curled orange peel). 

June 07, 2014 /Tamara Hilmes
Sweet
Summer
Comment

Bitter about butter

June 02, 2014 by Tamara Hilmes in Summer

Butter makes everything better. Too bad it's killing us all, particularly those of us who are lactose intolerant. Ahem. I recall an article that our eleventh-grade Spanish teacher had us read about a study about olive oil vs. butter. Countries that cooked primarily with the former were healthier, overall, or had longer lifespans, or something. 

But the thing is, butter tastes good. For instance, I previously posted about a dairy-free, gluten-free banana bread, but while delicious and earthy with its corn-flour grit, it couldn't hold a candle to this...

Brown Butter Banana Bread 

  • 3-4 overripe bananas
  • 1/3 cup salted butter
  • 1 egg 
  • 1 tsp vanilla
  • 1 cup light brown sugar 
  • 1 tsp baking soda
  • 1 pinch salt 
  • 1 tsp cinnamon 
  • 1/2 tsp nutmeg
  • 1 pinch ground cloves
  • 1 1/2 cups flour

Preheat oven to 350 degrees with rack in the middle. Grease a 9x5 loaf pan.

Brown butter over medium-high heat in a saucepan until amber in color and effusing the best nutty aroma of all. Set aside. In a large mixing bowl, mash the bananas. Pour in the browned butter and mix. Add the egg and vanilla and mix well, then add the sugar. Sprinkle the baking soda and salt over the mixture and stir in. Sprinkle in the spices and after combining, add the flour. Stir until just combined. Pour into greased loaf pan and bake for 50 minutes to an hour, or until a toothpick inserted into the center comes out clean. Allow to cool completely before removing from pan.

June 02, 2014 /Tamara Hilmes
Sweet
Summer
Comment
photo (1).JPG

Imaginary pie

April 28, 2014 by Tamara Hilmes in Summer

While in a whiskey cocktail haze this weekend, a friend attempted to convince another that "strappleberries," a hybrid between an apple and a strawberry, actually exist. He reminisced about the strappleberry pies of his youth, waxing poetic about their tart-yet-sweet filling paired with a cinnamon crust — a nice touch, I thought. 

On Sunday, his bleary ramblings came drifting back to me, and I decided to make his silly notion into a pastry reality. Behold, the "Strappleberry Pie." Max, this asymmetrical-lattice-topped pie is for you, pal.

Strawberry + Apple Pie w/ Cinnamon Crust

For the crust:

  • 2 1/2 cups flour
  • 2 tbsp sugar
  • 1 tsp salt
  • 2 tsp cinnamon
  • 2 sticks unsalted butter, cold & cubed
  • 1 cup water, very cold

For the filling:

  • 2 large Johnny Red apples, peeled and diced
  • 1 lb. fresh strawberries, sliced
  • 3/4 cup sugar
  • 2 tbsp flour
  • 1 tbsp cornstarch 
  • 1 tbsp chia seeds (optional)
  • 1 tbsp fresh lemon juice
  • 1 tsp cinnamon
  • 1/4 tsp nutmeg
  • 1/4 tsp salt
  • 1 egg, beaten

Start by making the dough for the crust. In a large bowl, mix flour, 1 tbsp sugar, and salt with a fork. Using a pastry blender or two forks, cut the pieces of butter into the flour mixture until crumbly, with pieces the size of small peas. Add a 1/2 cup of the cold water and blend until the mixture starts to come together. If necessary, add more water a little at a time until the dough comes together into a ball. Divide in half, and shape each piece into a disc before wrapping in plastic wrap. Refrigerate at least 1 hour. 

Meanwhile, wash and slice the fruit and combine with the remaining ingredients. Set aside. 

When it's time to roll out the crust, preheat the oven to 425 degrees and cover your work surface and rolling pin (or wine bottle) with flour. Unwrap the first disc and pat out slightly (it should be cold, and not super flexible). Start rolling out your crust and form a large circle. Fold the circle in half, then in half again and transfer to your pie plate. Unfold. Roll out the second crust in the same fashion, and slice the circle into strips for your lattice top. 

Pour the filling into the bottom crust, then form your lattice on top. Place pie plate on top of a rimmed baking sheet, to catch the juices. Brush with beaten egg and sprinkle with sugar before placing on the middle oven rack. 

Bake pie for 25 minutes until the top is golden, then reduce the temperature to 375 and bake for 30-40 minutes more, until juices are bubbling and apples are tender when pierced with a fork. 

Allow the pie to cool completely and rest for four hours or overnight before serving. 


April 28, 2014 /Tamara Hilmes
Sweet
Summer
Comment

Nan-cy Drew

April 10, 2014 by Tamara Hilmes

I've been going through a bit of a banana phase. Each week, I find myself stopping in at an overly priced natural foods market on my way home to buy a bunch of them, yellow with a tinge of green at the tips. But by week's end, brown blemishes have diminished the boomerang-shaped fruits' appeal, and they begin to rot on their perch above the microwave. 

So what to do? It doesn't take a sleuth to solve this mystery: banana bread. 

Lately, though, I've also been going through an "I really shouldn't eat dairy, including butter, because it's killing me, so I'm actually going to stop," phase. Which leads me to the coconut and cornmeal version of that dense, cake-like, banana-ridden bread you'll find below.

It's gritty, it's a bit more healthy, and it's heavy on the banana — and it still hits the spot.

Banana + Walnut Bread 

no dairy, no glutens 

  • 3 overly ripe bananas 
  • 1/3 cup melted coconut oil 
  • 1 egg, beaten
  • 2 tsp vanilla
  • 3/4 cup brown sugar, packed
  • 1/4 cup walnuts, chopped
  • 1 tsp cinnamon
  • 1/2 tsp nutmeg 
  • 1 dash ground cloves
  • 1 tsp baking soda
  • 1 pinch table salt 
  • 1 1/2 cups corn flour 

Preheat oven to 350. Grease a 9x5 loaf pan and set aside. Mash bananas with a fork in a large mixing bowl. Stir in melted coconut oil, then add egg, vanilla, and sugar. Mix in the walnuts and spices. Sprinkle the baking soda and salt over the mixture and stir in. Add the corn flour last. Pour batter into the prepared pan and bake in the center of the oven for 50 minutes, until a toothpick inserted in the center of the loaf comes out crumb-free.


April 10, 2014 /Tamara Hilmes
Comment
photo (12).JPG

Where have all the Bundt pans gone?

April 07, 2014 by Tamara Hilmes

The Bundt pans of the world really haven't gone anywhere. In fact, they are fairly easy to purchase from just about any store that sells cake pans. I have merely chosen to abstain from the ownership of such a — sorry, Mom, Grandma — monstrosity. 

I do not know from whence my repugnance for Bundt pans originated. I only know that from a young age, I found them tacky and strange and pointless. I have come to realize that tube pans, at least, serve a very real purpose. The giant donut hole in the center of the pan allows the middle of the cake to cook evenly along with the rest. But that strange, molded shape that recalls discolored Jell-O masses I saw when paging through my mom's 1980s Wilton magazines? I do not understand it. 

That said, it felt a bit wrong to bake my mom's sour cream coffee cake in anything but a Bundt pan. I can distinctly picture her slicing into that sloped dome-y shape to reveal the cinnamon-streusel striations. The spring-form pan I substituted, though, managed the job just fine. 

I did find that I needed to bake this cake a bit longer to finish cooking that non-hole-y center, which in turn stole some of the cake's sour cream moisture. To make amends, I drizzled on a bit of bourbon caramel sauce. 

photo 2.JPG
photo 1 (1).JPG

Sour Cream Coffee Cake 

adapted from my mom's recipe

For the cake: 

  • 1 3/4 sticks unsalted butter
  • 1 1/2 cups granulated sugar 
  • 3 large eggs
  • 1 1/2 tsp vanilla 
  • 1 cup sour cream 
  • 2 1/2 cups flour
  • 2 tsp baking powder
  • 1/2 tsp baking soda 
  • 1/2 tsp salt 

For the streusel: 

  • 1/4 light brown sugar
  • 1/2 cup flour
  • 2 tsp cinnamon
  • 1/4 tsp salt
  • 3 Tbsp cold, unsalted butter, cut into small pieces
  • 1 cup chopped pecans 

Preheat the oven to 350 degrees with the rack in the center. 

Cream the butter and sugar in the bowl of an electric mixer on medium-low for 5 minutes until light and fluffy. Add one egg at a time, beating after each addition to combine. Add the sour cream and vanilla and beat on medium for a minute. 

In a separate bowl, mix together the flour, baking powder, baking soda, and salt. Turn the mixer to stir and gradually add the dry mixture until it's all just combined. Set batter aside. 

In the empty dry ingredients bowl, combine the ingredients for the streusel except for the pecans. Use your fingers to pinch the butter apart and into the sugar mixture until it forms a crumble. Stir in the nuts. 

Grease and flour a 10-inch Bundt or spring-form pan. Spread half the cake batter into the bottom of the pan using a knife. Sprinkle 3/4 cup of the streusel evenly over the batter layer. Then, spread the remaining half of the batter on top, and cover with the rest of the streusel. 

Bake the cake for 50-60 minutes, until a toothpick comes cleanly out of the center (note: you may need to leave it in up to 10 minutes longer if you're using a non-Bundt pan).

Allow cake to cool completely before releasing it from its pan confinement. 

Bourbon Caramel Sauce 

  • 1 cup sugar 
  • 1/4 cup water 
  • 2 Tbsp unsalted butter
  • 1 cup soy milk
  • 2 Tbsp bourbon 
  • 1 tsp vanilla
  • A dash of salt

In a saucepan, mix water and sugar. Place over medium heat and cook, without stirring, until it turns a golden amber color. Stir until crystals have dissolved, then remove from heat and, stirring constantly, add butter and soy milk. Stir in bourbon, vanilla, and salt. Return to heat and cook a few minutes more, until smooth. 

You can make this sauce ahead of time and reheat it just before drizzling over the coffee cake. 

April 07, 2014 /Tamara Hilmes
Comment

Ode to elote

April 03, 2014 by Tamara Hilmes

I love corn, despite its utter lack of any real nutritional value. Blame my Midwestern roots, or my being particularly partial to Mexican food and its regimen of seasonings, but for Soup Swap this week, I felt determined to make a soup with corn and cumin — the rest would follow. 

In anticipation of charcoal-crusted foods fresh from the grill, I had elote on the mind. That is, Mexican corn on the cob, typically smeared with a crema-mayo concoction, chili powder, cotija cheese, and lime juice. While I didn't embrace my homeland so far as to actually put mayonnaise in a soup, I did try to mimic the summery street food's flavors. 

Sopa de Elote 

  • 2 tbsp olive oil
  • 1 yellow onion, diced
  • 2 cloves garlic, minced
  • 1 poblano pepper
  • 3 cups yellow corn kernels 
  • 3-4 cups chicken or veggie stock
  • 2 cups soy creamer or whole milk
  • 1/2 tsp table salt 
  • 1/2 tsp black pepper
  • 1 tsp chili powder
  • 1 tsp cumin 
  • 1/4 tsp coriander 
  • cilantro
  • limes
  • grated cotija cheese (optional)

Preheat broiler on high with oven rack in the highest position. Slice poblano pepper in half and remove stem and seeds. Lay pepper halves skin side down on a foil-lined baking sheet and broil for about 10 minutes, until skin begins to blacken and blister. Once cool, dice and set aside.

Heat olive oil in a large saucepan or pot over medium heat and cook onions until they begin to turn soft and translucent. Add the garlic and cook 1 min. more. Add the pepper and the spices and cook 3 min. Add corn and stir to combine with other vegetables. Cook a few minutes before adding the chicken stock. Bring pot to a boil, then lower to a simmer. Cook about 10 minutes. After 10 minutes, lower the temperature and stir in the milk or creamer. Add additional salt and pepper to taste. 

To serve, ladle into bowls and top with chili powder, fresh cilantro, lime, and grated cotija cheese (unless you're going dairy-free). 


April 03, 2014 /Tamara Hilmes
Comment
photo (22).JPG

Chai to understand

March 31, 2014 by Tamara Hilmes

Picture this: a Vermont farmhouse with an open layout, natural wood floors, and crisp white walls. Students mill about, studying the bronze Krishna statuettes perched on end tables and banquettes. In the kitchen, a large stainless steel pot sends steam curling toward the ceiling, infusing the air with hints of black assam, ginger, cinnamon, and cardamom.

A class dinner at my art history professor's home was my first introduction to masala chai, an occasion that is steeped deep into my memory. 

Being dairy-deprived as I am, I concocted this dreamy masala chai with homemade cashew milk.

Cashew Milk Masala Chai 

For the cashew milk: 

  • 2-3 cups water
  • 1 cup raw cashews, soaked in water overnight
  • A dash salt
  • 1 tsp honey 
  • 1 tsp cinnamon
  • 2 tsp vanilla extract

For the chai: 

  • 2 cups water
  • 1 tsp freshly grated ginger
  • 1 tsp ground black pepper
  • 4 whole cloves
  • 1 cinnamon stick, broken into pieces 
  • 4 whole allspice berries
  • 2 tbsp sugar or agave syrup
  • 2 tbsp loose black tea (assam) 

Drain soaked cashews and rinse until water runs clear. Add cashews and 2 cups water to a blender, and pulse/puree until the nuts are completely pulverized. Add a bit more water, and blend again. Add salt, honey, cinnamon, and vanilla. Strain through cheesecloth or nut milk bag to achieve an appetizing, smooth, milk-like texture.

In a saucepan, bring water, spices, and sugar to a boil. Add 2 cups cashew milk and bring to a boil once again. Remove pan from heat, and add the tea. Cover and let steep for 5 minutes. Stir, then strain through a fine mesh sieve (or a sifter or cheese cloth or a french press). 

March 31, 2014 /Tamara Hilmes
Comment

Let's eat weed

March 27, 2014 by Tamara Hilmes in Spring

"Shut up, dill weed," my brother would say to me, out of earshot of my parents. Oh youth.

This particular soup leans on new potatoes, baby root veggies plucked from their earthen wombs too soon. Combined with the surprising bite of fresh dill, these newborns knit a dish that toes the line between winter and spring. 

New Potato & Dill Soup

  • 1 lb. or so new potatoes, halved or quartered
  • 2 large carrots, diced
  • 1 yellow onion, diced
  • 1 bunch dill, roughly chopped
  • 2 tbsp olive oil
  • 3 cups chicken/veggie stock 
  • 1 cup whole milk/soy creamer
  • 2 tbsp flour
  • 1/2 tsp salt
  • 1 tsp pepper
  • 1/4 tsp paprika 

Heat olive oil in pot or saucepan over medium. Add onions and carrots and cook until soft, about 6 minutes. Add the potatoes, spices, and half of the dill and cook a few minutes more. Add the chicken stock and bring to a boil. Boil for 10 minutes, or until potatoes start to get tender. In a bowl, whisk together the milk and the flour. Add this to the pan and cook for about 5 minutes more, stirring. Ladle into bowls and top with remaining fresh dill.

March 27, 2014 /Tamara Hilmes
Savory, Soup
Spring
Comment
  • Newer
  • Older

Powered by Squarespace